News
Setting Up a Product Photography Studio
I’ve been shooting product photos for a few years now, and over the years I’ve gone from shooting on a table in a corner under incandescent lights with a 6MP Cannon Digital Rebel at Goorin Brothers to my current setup at OSI. It has been a long journey and most of my current knowledge was fine tuned during my employment at Dita Eyewear. Fortunately, at Dita I had the opportunity to learn quite a bit from professional photographer and Dita Eyewear co-founder John Juniper. Working with John was an invaluable experience and although we had all the right equipment at Dita, space was extremely limited which prevented us from taking full advantage of the equipment. But, we made the best of what we had to work with and some amazing photos came out of that office.
When I started at OSI they were outsourcing all of their product photography, which was less than ideal since it was costing the company quite a bit of money, not to mention the turn around time. One of my first projects was to build out a professional studio setup from scratch so that we could do much of our own product photography in house.
Choosing a Location
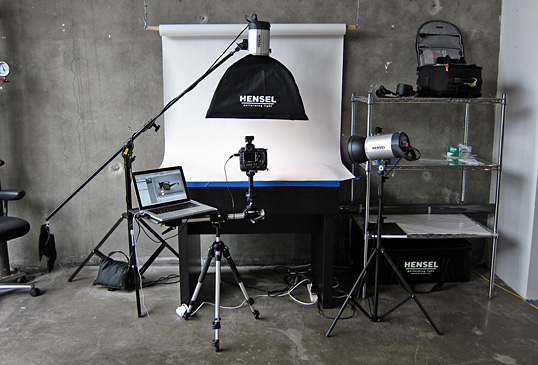
The OSI office is fairly large open space, so I had quite a few locations to choose from. I needed a location that could be flexible and accommodate any shooting condition we could think up. I ended up going with a location that was off the beaten path, but with lots of adjustable natural light. Adjustable natural light was the key and I found it next to a large two stage roll up door. The inner door is constructed of clear Plexiglas panels that I believe is locked shut, while the outer door is solid steel. Both doors work independently, so with the push of a button the steel door can be raised or lowered for full natural light or semi-darkness.
Shooting Surface
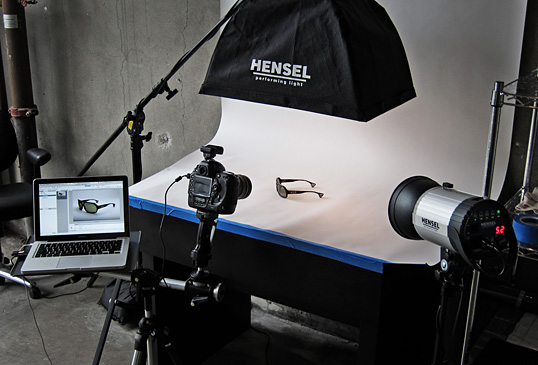
For the shooting surface I used an old light box table that was sitting unused in my office. The height and surface size of the light box was a perfect fit. I hung the white seamless from an exposed steel drainage pipe using a rigging I constructed from $35 worth of materials found at Home Depot. The seamless rigging consists of a two zink plated screw eyes attached to both ends of a standard 1-1/4″ wooden closet rod (cut to size). I then attached two lengths of clear-vinyl coated 1/16″ steel wire rope to the exposed ceiling pipe using a few wire rope clamps. Lastly, I attached the right steel wire rope directly to one end of the wooden rod, and using a spring link (carabiner) I attached the left steel wire rope to the other end of the wooden rod. The spring link allows me to easily swap out the seamless roll.

Lighting
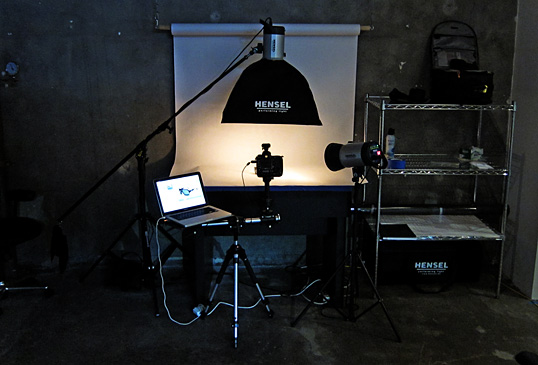
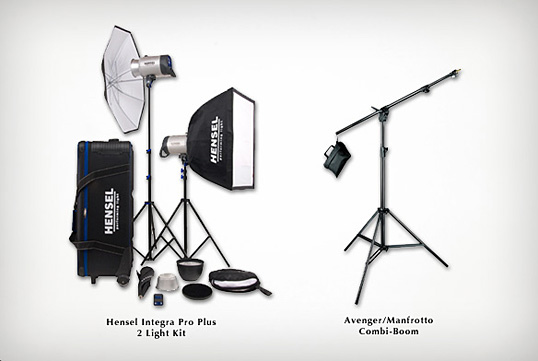
Lighting is probably the most important piece of any studio setup, with the correct lighting you can pretty much shoot anything you can imagine. For this setup I went with Hensel’s Integra Pro Plus 2 Light Kit. I choose this kit because it includes everything you could possible need in a strobe flash setup; Wireless Transmitter, 7″ Grid Reflector+Grid, Soft Box and light stands. The lights themselves offer 1/10 stop power adjustment and a 300W modeling lamp which becomes quite useful when setting your strobe positions. The only extra item I needed that was not included in the Hensel kit was a light boom. The light boom is used to properly position the Soft Box above the shooting table, I ended up going with the Avenger/Manfrotto Combi-Boom.
Camera Setup
For this setup I’m using a tethered full-frame 12.1MP Nikon D3s. Personally, I’m a Canon guy and if this was my own setup I probably would have chosen the Canon EOS 5D Mark II or even the new Canon EOS 7D. I feel that the Nikon D3s is a bit more than what we actually need, it is really more of a high speed sports or lo-light action camera. However, our Creative Director personally purchased the D3s and hey I can’t really complain, it is an amazing camera to be able to play around with.
The lens I’m using is the Nikon AF-S NIKKOR 24-70mm f/2.8G ED, which is the perfect go to lens for most studio situations (and more). In the future I would also like to add the Nikon AF-S VR Micro-NIKKOR 105mm f/2.8G IF-ED to the setup. The 105mm macro lens would be perfect for getting those super up close and personal detail shots.
The camera itself is mounted to a Manfrotto Joystick Head. The Joystick head along with a Gitzo Laptop Platform are attached to a standard tripod using a the Manfrotto Accessory Arm 131DDB. This configuration allows you to mount a tethered laptop next to your camera while retaining camera mobility with the Joystick Head.
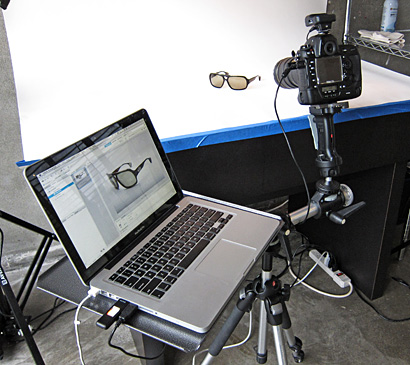
Of course you could skip the Accessory Arm/Laptop Stand entirely and shooting directly to the cameras CF card with excellent results. However, one of the major advantages of shooting tethered to a computer is that it allows you to preview your images at full size as they are shot using Bridge and/or Photoshop. This immediate preview is extremely useful when setting up your lighting and product positioning. To top it off, all the images are saved directly to a 16GB USB drive, so when I’m done shooting all I need to do is eject the drive and go.
Conclusion
So that is pretty much all there is to my product photography set up at OSI. I’m not going to go into light positioning, camera settings and image retouching; those items can easily fill multiple posts on their own.
To recap, here is a list of all the equipment purchased for this setup:
- Hensel’s Integra Pro Plus 2 Light Kit
- Avenger/Manfrotto Combi-Boom
- Manfrotto Joystick Head
- Gitzo Laptop Platform
- Manfrotto Accessory Arm 131DDB
- Nikon D3s
- Nikon AF-S NIKKOR 24-70mm f/2.8G ED
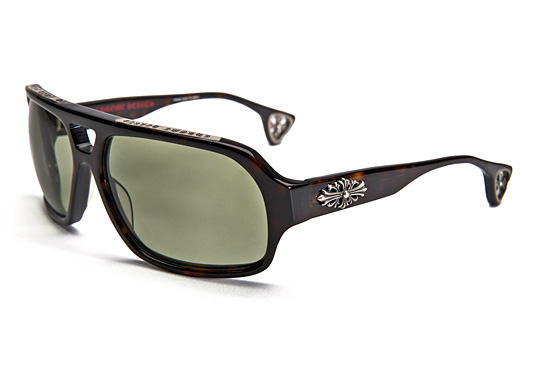
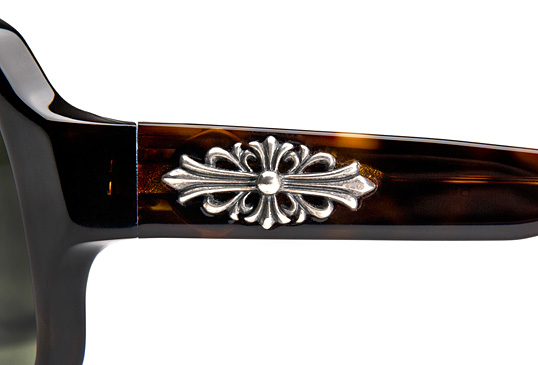
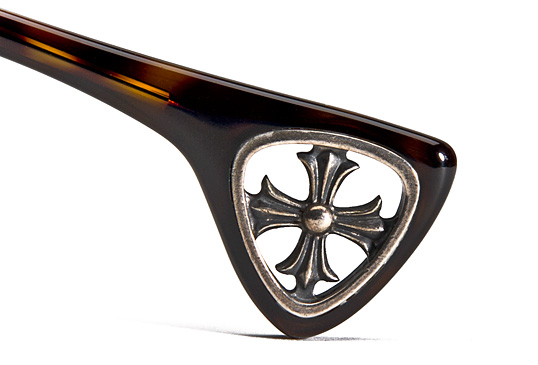
The Results
Just a few shots i took for the purpose of this post.
Comments (2)
Thanks for sharing your setup. I’m researching tables and lighting at the moment. I’m considering strobes as opposed to continual lights so that I can also use them for portraits. Any drawbacks to this do you think?
Quite helpful, thank you. It is a comprehensive list of useful accessories for product and tabletop photography.
Add a New Comment
SEARCH
CALENDER
| << | June 2026 | |||||
|---|---|---|---|---|---|---|
| S | M | T | W | T | F | S |
| 1 | 2 | 3 | 4 | 5 | 6 | |
| 7 | 8 | 9 | 10 | 11 | 12 | 13 |
| 14 | 15 | 16 | 17 | 18 | 19 | 20 |
| 21 | 22 | 23 | 24 | 25 | 26 | 27 |
| 28 | 29 | 30 | ||||